
Firebase is a mobile-backend-as-a-service that provides powerful features for building mobile apps. Firebase has three core services: a realtime database, user authentication and hosting. With the Firebase iOS SDK, you can use these services to create apps without writing any server code.
In this Firebase tutorial, you’ll learn the fundamentals of Firebase by making a collaborative grocery list app called Grocr. When items get added to the list, they’ll appear instantly on any user’s devices, but you’re not going to stop there. You’ll tweak Grocr to work offline, so the list stays in sync even with a spotty grocery store data connection.
As you work, you’ll learn about:
- Saving data to a Firebase database.
- Syncing data in realtime.
- Authenticating users.
- Monitoring online users.
- Enabling offline support.
Get ready to realtime all the things!
Getting Started
Start by downloading the materials for this tutorial; you can find a link at the top or bottom of this page. This project uses CocoaPods to manage dependencies and they are included in the downloaded projects.
This project contains three view controllers:
- LoginViewController.swift: the login is currently using hard coded credentials, but you’ll fix that soon.
- GroceryListTableViewController.swift: this is a subclass of
UITableViewControllerthat adds items to a list of local data using aUIAlertController. - OnlineUsersTableViewController.swift: this controller will use Firebase’s presence feature to display all of the users currently online.
In addition to the view controllers, there are two models, GroceryItem.swift and User.swift.
Build and run, and you’ll see the app looks like this:
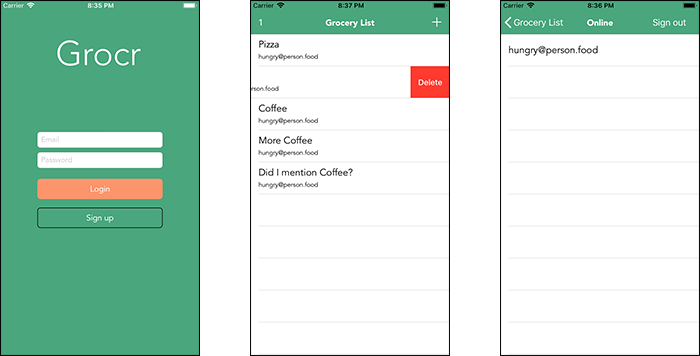
You can log in just by tapping Login, which will use a hard-coded user. If you play around, you’ll see that the app currently only works with local data. Next, you’ll use Firebase to bring the app to life.
Setting up a Firebase Account
There are three main steps to setting up Firebase in an iOS project:
- Create a free Firebase account
- Download and add GoogleService-Info.plist to your app
- Tell Firebase to start when your app launches
To create a Firebase account, visit the Firebase homepage. Press GO TO CONSOLE in the top-right corner, and enter the credentials for your Google account, if you’re not signed in already. If you don’t have a Google account, you’ll need to create one first, which you can do here.
You’ll then have a clean Firebase console created for you. Don’t worry about forking over any money; everything in this Firebase tutorial can be done with the free plan.

It’s time to create your first project, so click the + Add project button.
In the dialog that appears, enter Grocr as the Project name and select your preferred Country/region:

Click CREATE PROJECT, wait for it to create and then press Continue to be taken to your project’s dashboard:

This is a container for your project’s Firebase services. You’ll use it to store data and authenticate users.
Select the circle iOS button above Add Firebase to your iOS app. Enter rw.firebase.gettingstarted in the iOS Bundle ID field:

Click REGISTER APP and then click Download GoogleService-Info.plist. Follow the instructions and move it to the Grocr project in Xcode.
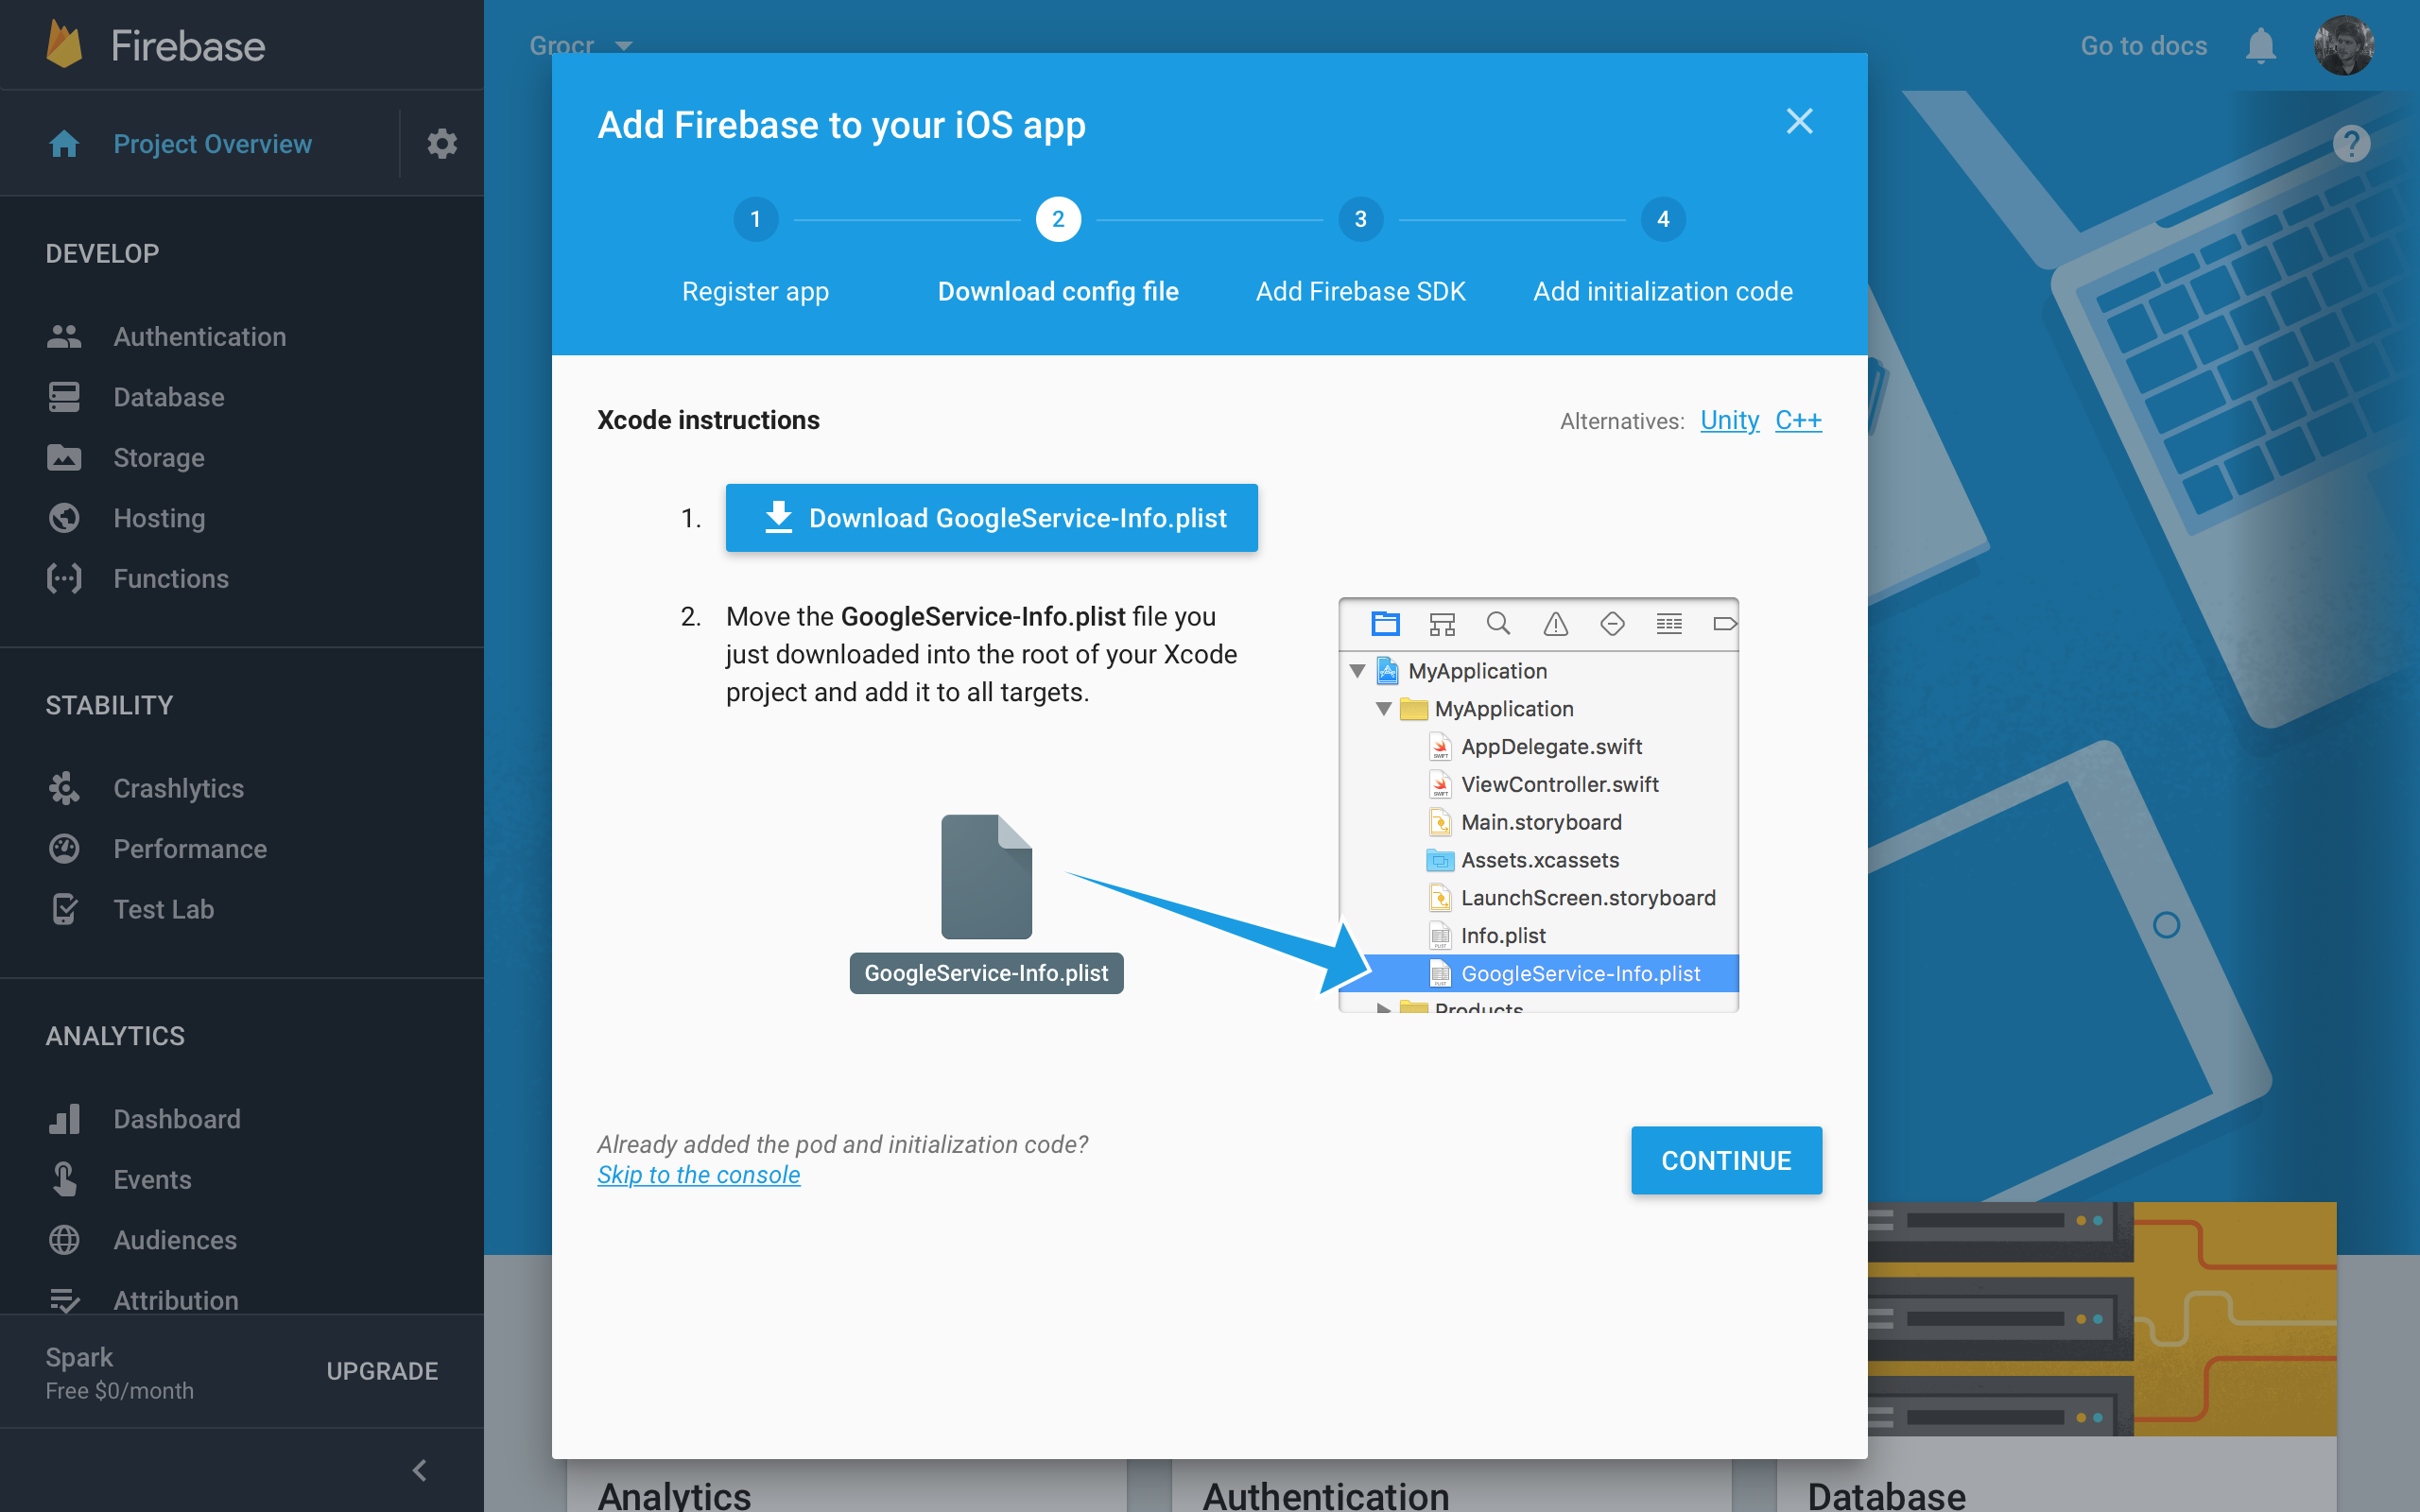
When prompted by Xcode, make sure Copy Items if needed is checked.
Return to your Firebase project’s webpage, and click CONTINUE. The next page describes how to install the Firebase SDK:

The starter project already includes the SDK, so just click CONTINUE. The last page explains how to connect Firebase when your app starts:

You need to do this in the tutorial app. In Xcode, open AppDelegate.swift and add this code before the return statement within
application(_:didFinishLaunchingWithOptions:):FirebaseApp.configure()
Back on your Firebase project’s webpage, click FINISH to see your new project’s details:

That’s it!
Creating a Connection to Firebase
With your Firebase app set up, go to Xcode and open GroceryListTableViewController.swift. Where the properties are defined, add the following:
let ref = Database.database().reference(withPath: "grocery-items")
This establishes a connection to your Firebase database using the provided path. In the documentation, these Firebase properties are referred to as references because they refer to a location in your Firebase database.
In short, this property allows for saving and syncing of data to the given location.
You’ll notice the base URL is not used. Instead, it uses a child path of
grocery-items. The Firebase database is a JSON NoSQL database, so all data is stored as JSON.
JSON is a hierarchical key-value data structure – keys refer to objects that can contain values pointing to other objects. JSON data is simply a tree of key value pairs.
With Firebase, the key is a URL and the value is arbitrary data that could be a number, string, boolean or object.
Structuring Data
No matter how it’s formatted on the client, all data stored in Firebase is JSON. Take a look at the following sample JSON data:
// The root of the tree
{
  // grocery-items
  "grocery-items": {

    // grocery-items/milk
    "milk": {

      // grocery-items/milk/name
      "name": "Milk",

      // grocery-items/milk/addedByUser
      "addedByUser": "David"
    },

    "pizza": {
      "name": "Pizza",
      "addedByUser": "Alice"
    },
  }
}
In the JSON tree above, you can see there’s a path mapped to every piece of data. You can continue to traverse down the tree and retrieve data at deeper locations.
In the case of the data above, you can retrieve all grocery items by using the path:
grocery-items
If you only want to get the first grocery item you can navigate its child path:
grocery-items/milk
Since all Firebase keys map to paths, the key names you choose are especially important.
Understanding Firebase References
A fundamental theme to grasp is that a Firebase reference points to a location in Firebase where data is stored. If you create multiple references, then they all share the same connection.
Have a look at this sample code:
// 1
let rootRef = Database.database().reference()

// 2
let childRef = Database.database().reference(withPath: "grocery-items")

// 3
let itemsRef = rootRef.child("grocery-items")

// 4
let milkRef = itemsRef.child("milk")

// 5
print(rootRef.key)   // prints: ""
print(childRef.key)  // prints: "grocery-items"
print(itemsRef.key)  // prints: "grocery-items"
print(milkRef.key)   // prints: "milk"
Here’s what’s going on:
- You create a reference to the root of the Firebase database.
- Using a URL, you can create a reference to a child location in your Firebase database.
- From the
rootRefyou can usechild(_:)to create a child reference by passing the child path. This reference is the same as the one above. - Using the
itemsRef, you can create a child reference to themilklocation. - Every reference has a
keyproperty. This property tells you what the key name is in the Firebase database.
You don’t need to add this code anywhere in the sample project, it’s purely for illustrative purposes. :]
Adding New Items to the List
Near the bottom of GroceryListTableViewController.swift, find
addButtonDidTouch(_:).
This is where you present the user with a UIAlertController to add a new item.
Inside the method, locate
saveAction. Currently, it only saves the data to a local array, so saveAction won’t sync across multiple clients and disappears when you restart the app.
Nobody’s going to want to use an app that doesn’t remember or sync their grocery list! Replace
saveAction with the following:let saveAction = UIAlertAction(title: "Save",
style: .default) { _ in
// 1
guard let textField = alert.textFields?.first,
let text = textField.text else { return }
// 2
let groceryItem = GroceryItem(name: text,
addedByUser: self.user.email,
completed: false)
// 3
let groceryItemRef = self.ref.child(text.lowercased())
// 4
groceryItemRef.setValue(groceryItem.toAnyObject())
}
Here’s what’s going on:
- Get the text field, and its text, from the alert controller.
- Using the current user’s data, create a new, uuncompleted
GroceryItem. - Create a child reference using
child(_:). The key value of this reference is the item’s name in lowercase, so when users add duplicate items (even if they capitalize it, or use mixed case) the database saves only the latest entry. - Use
setValue(_:)to save data to the database. This method expects aDictionary.GroceryItemhas a helper function calledtoAnyObject()to turn it into aDictionary.
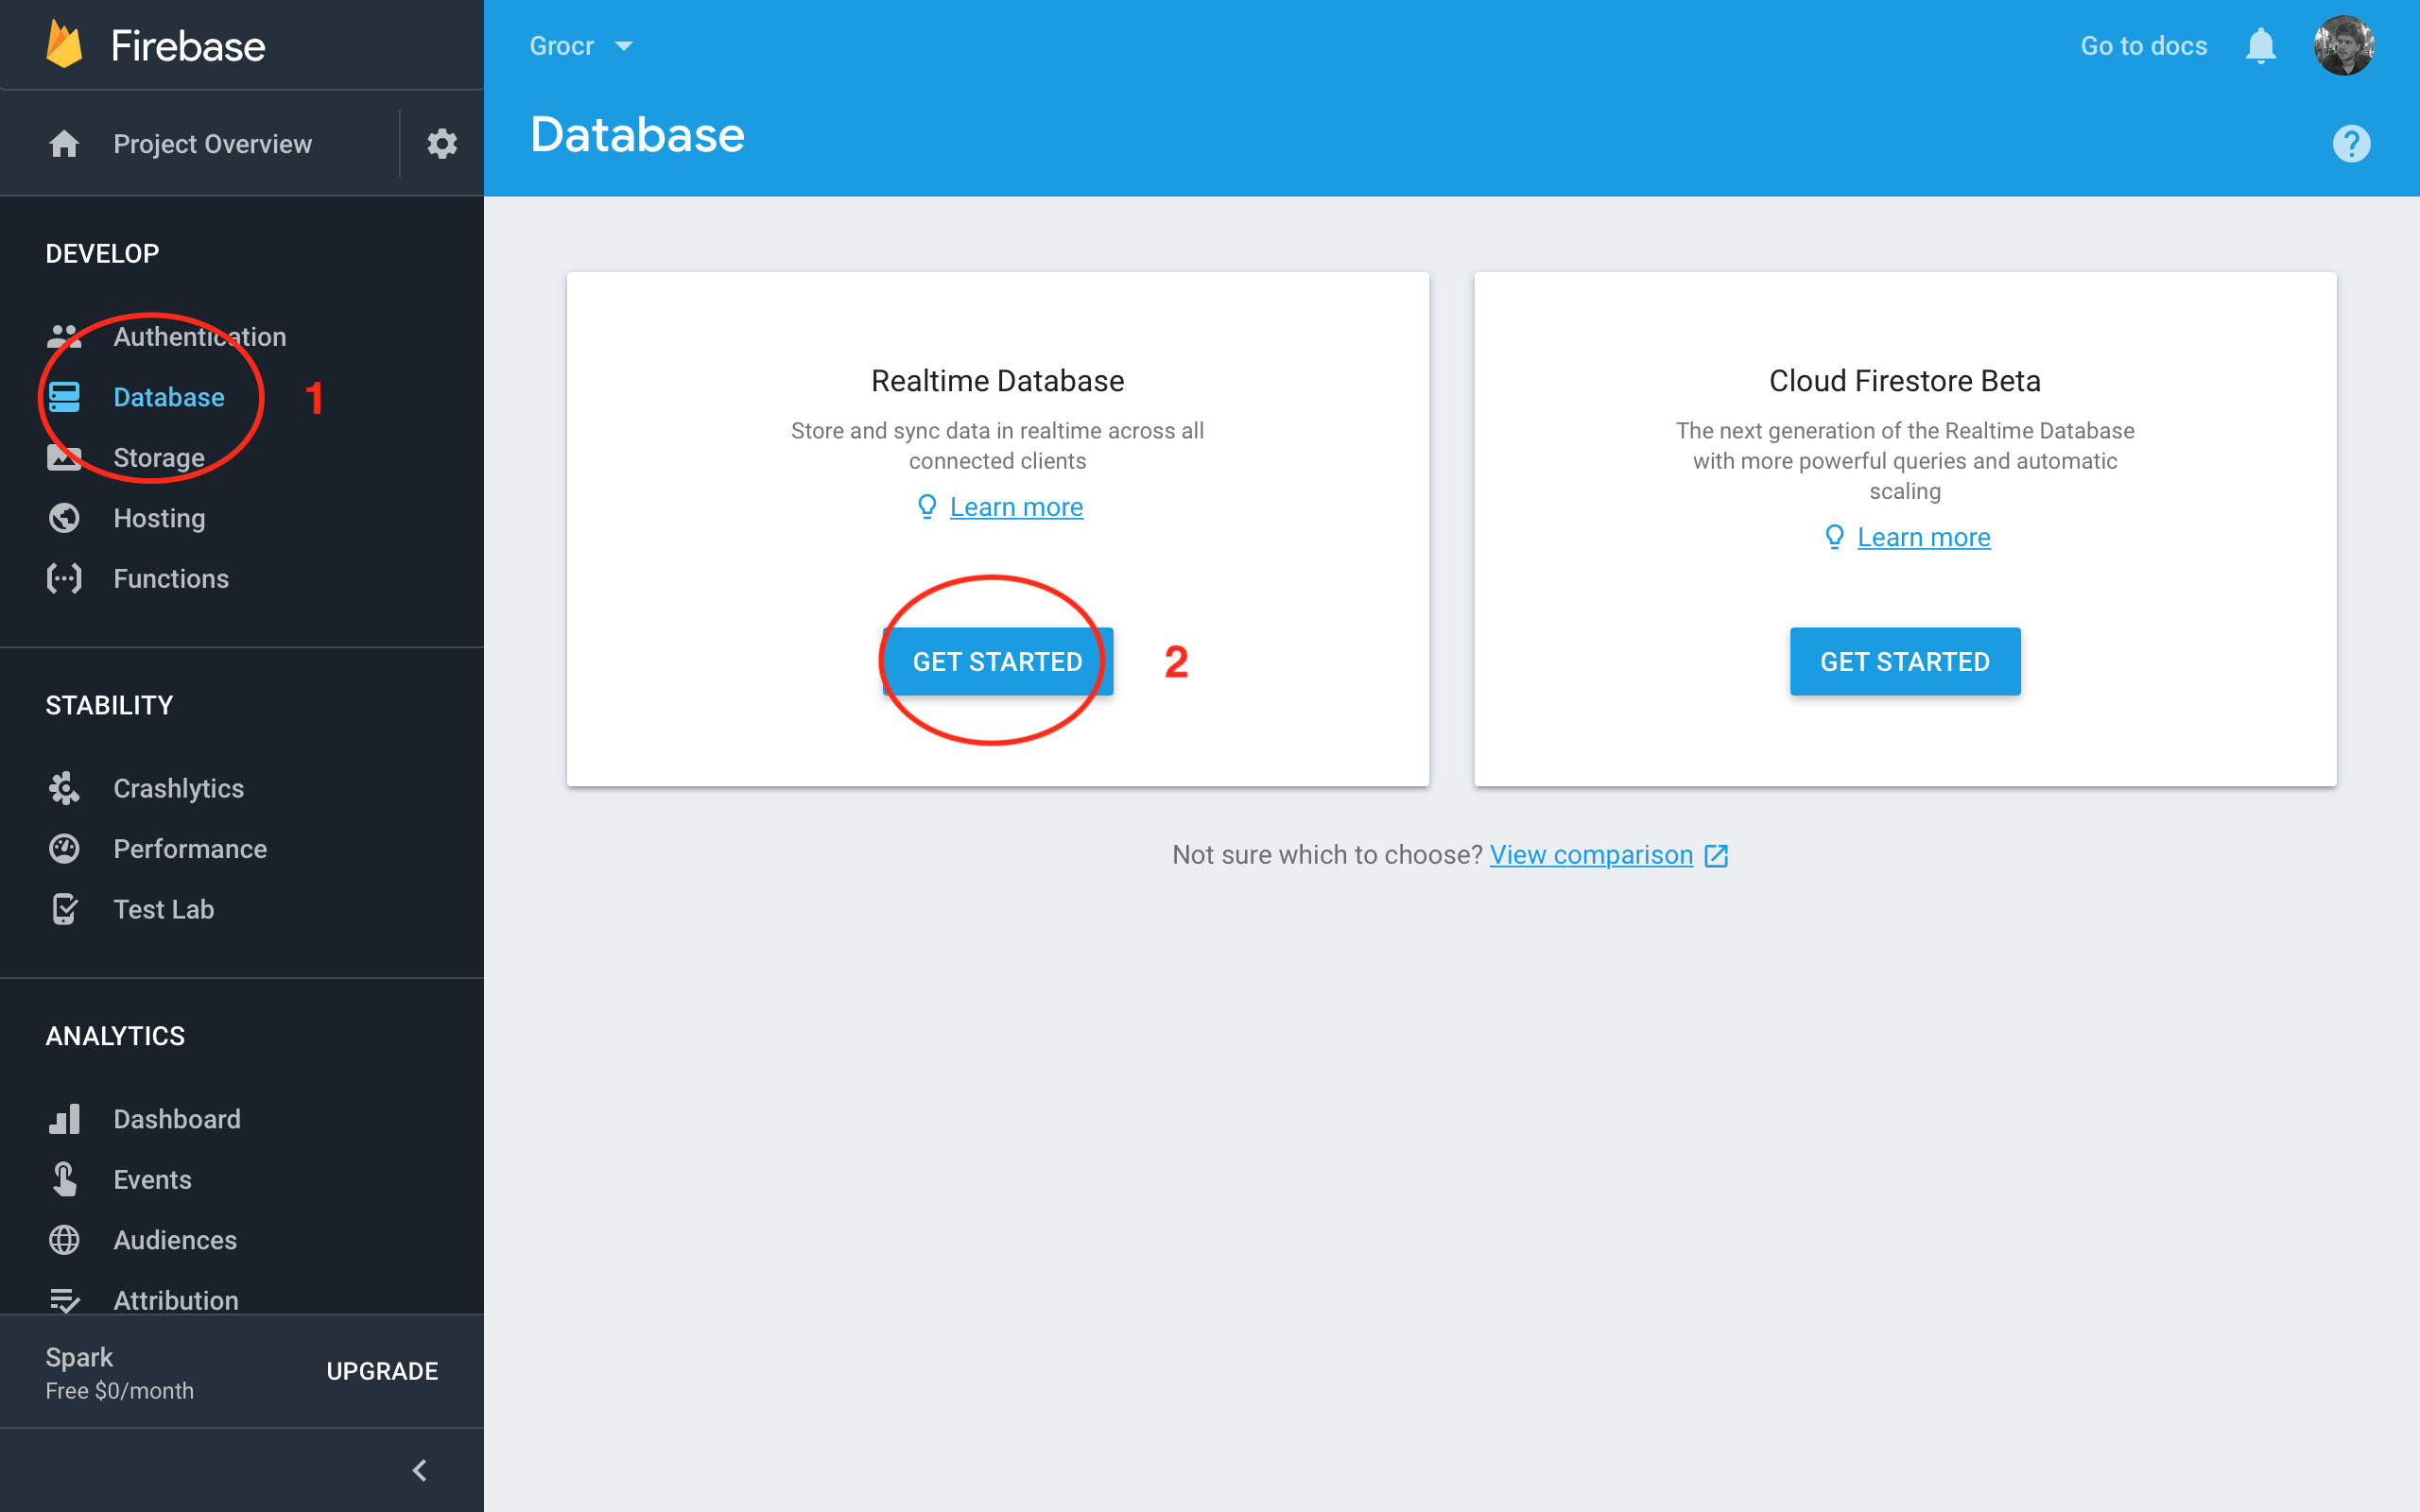
You next need to change database settings. Go to the Firebase dashboard in your browser and select the Database option on the left, followed by Get started for the Realtime Database section.
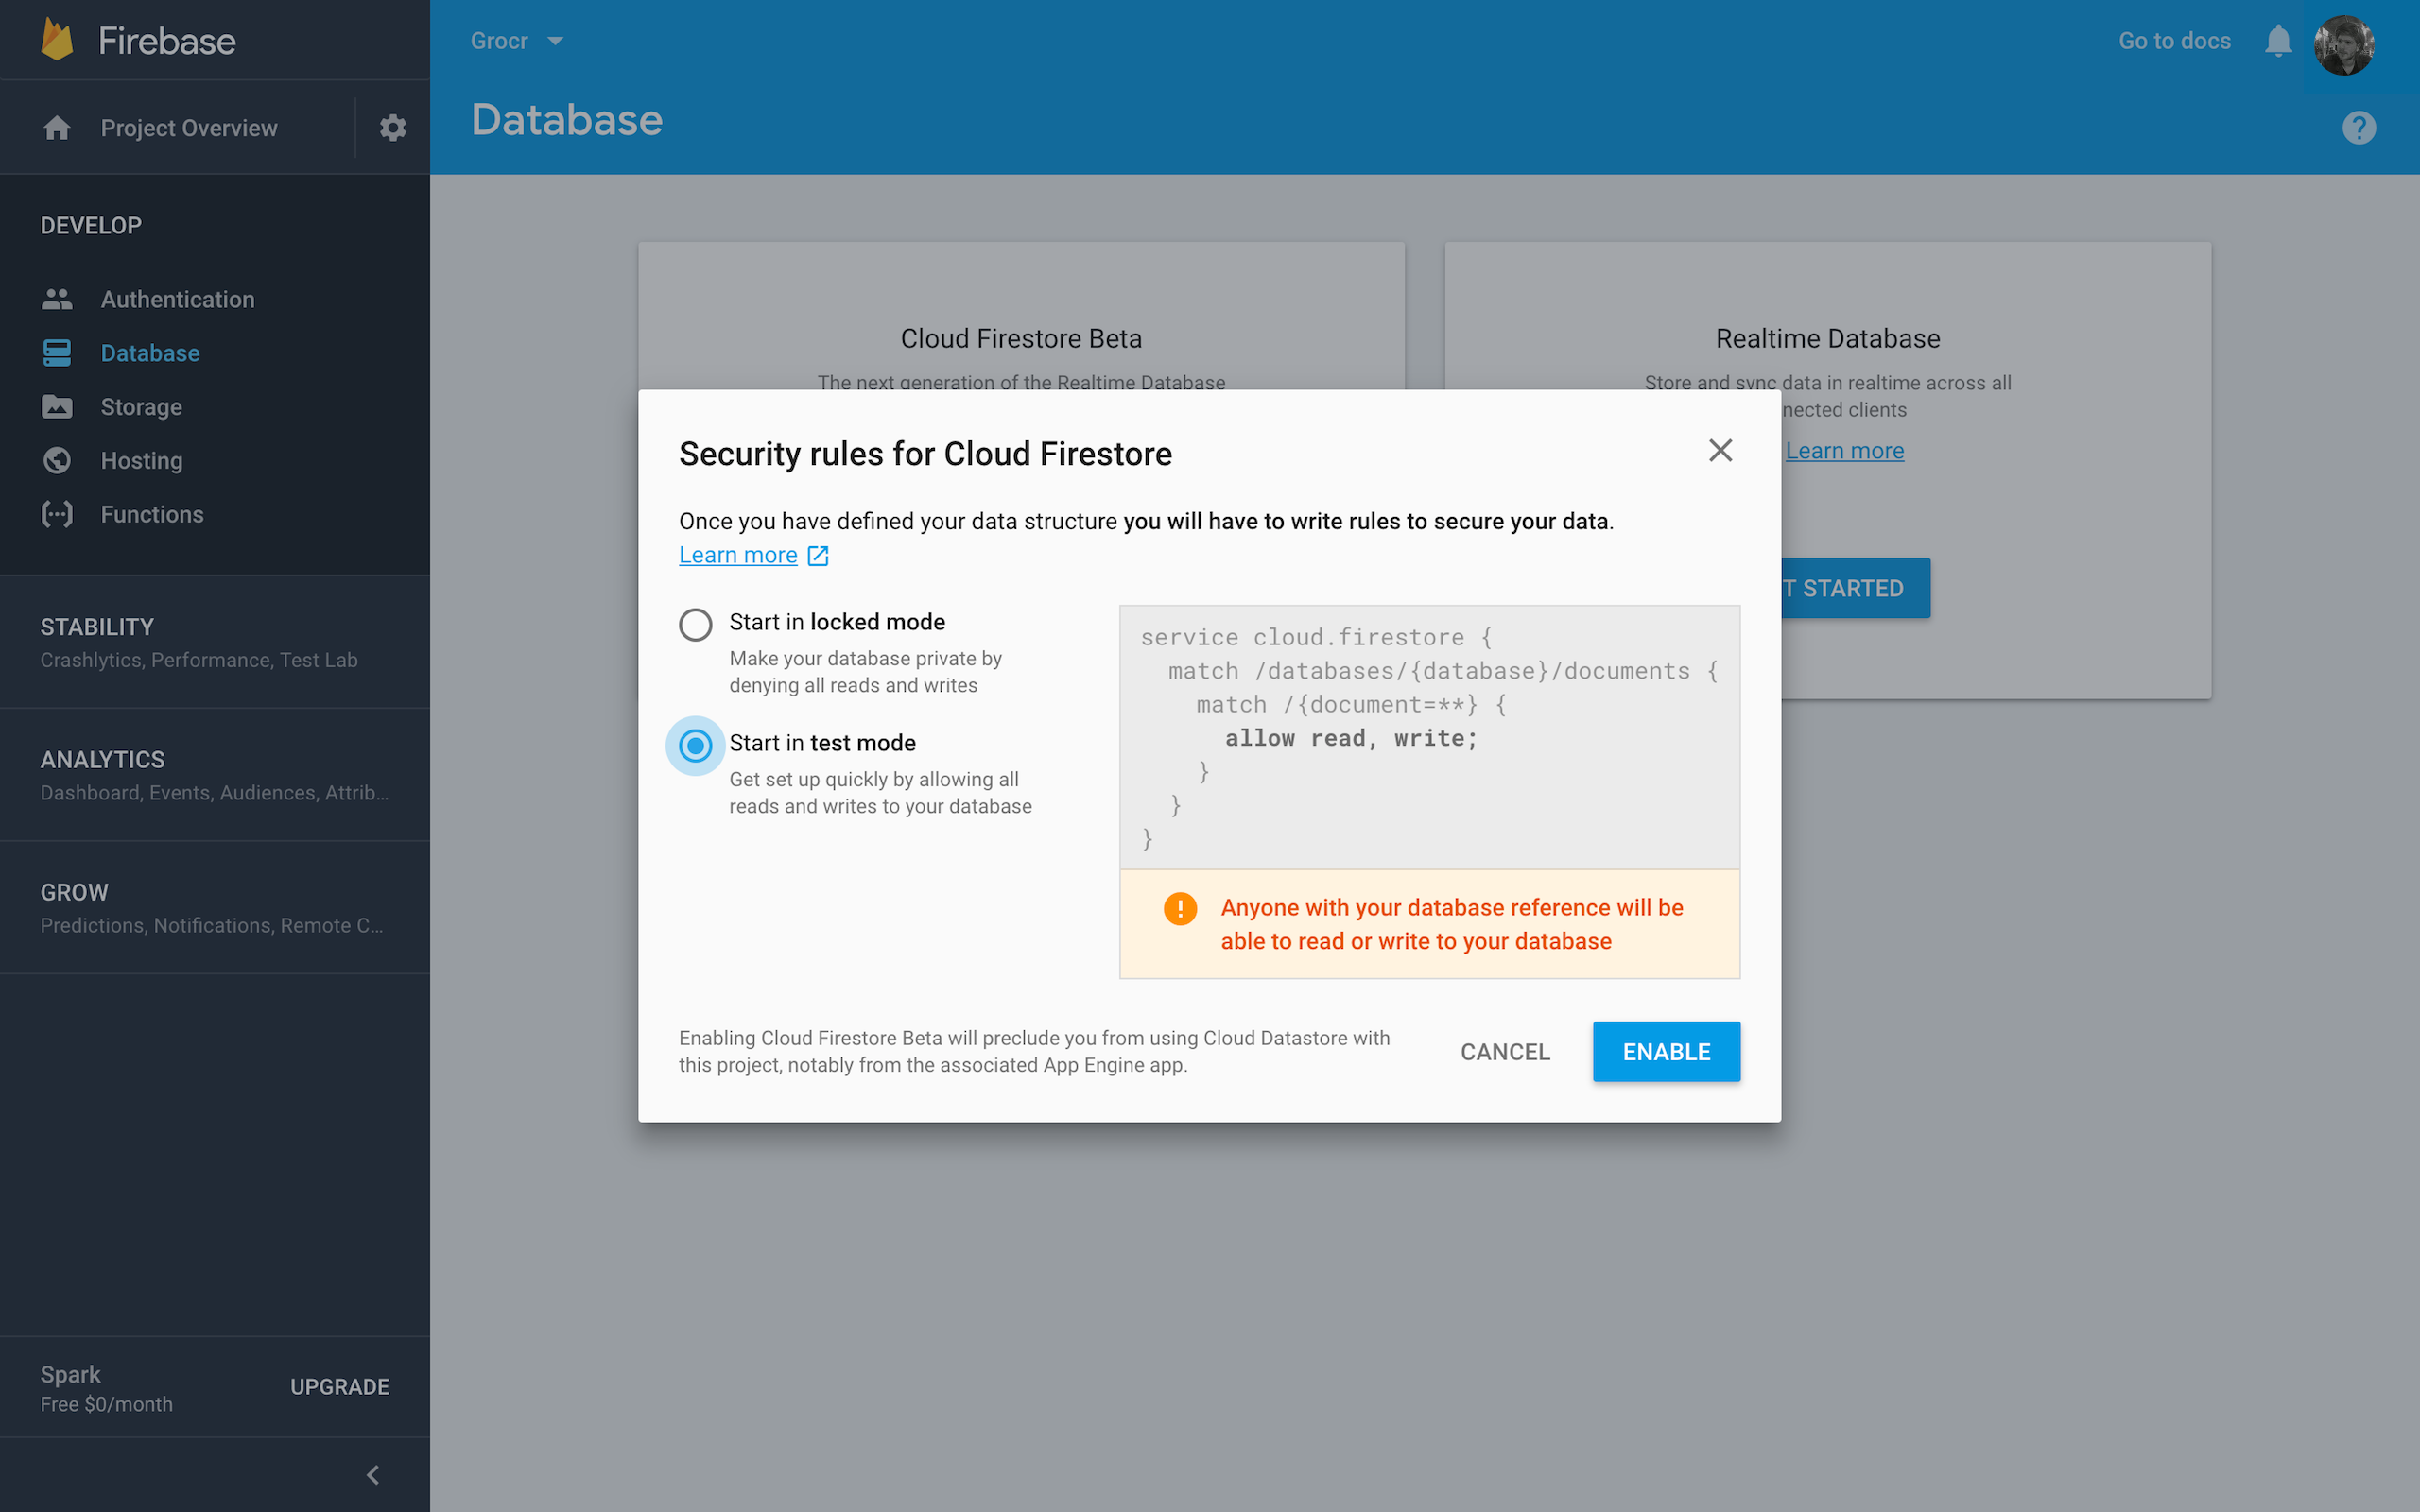
In the dialog for Security rules for Cloud Firestore, select Start in test mode and press ENABLE.
Cloud Firestore is an alternative to the Realtime Database and is currently in beta. If you’re curious, you can learn more about it here.
In this Firebase tutorial, you’ll use the Realtime Database instead of Cloud Firestore. Select the dropdown next to Database and pick Realtime Database.

By default, the Realtime Database requires user authentication for reading and writing. When you selected test mode earlier, you set Firebase to always allow both, to make it easier during development. Select RULES and verify the following in the editor:
{
  "rules": {
    ".read": true,
    ".write": true
  }
}
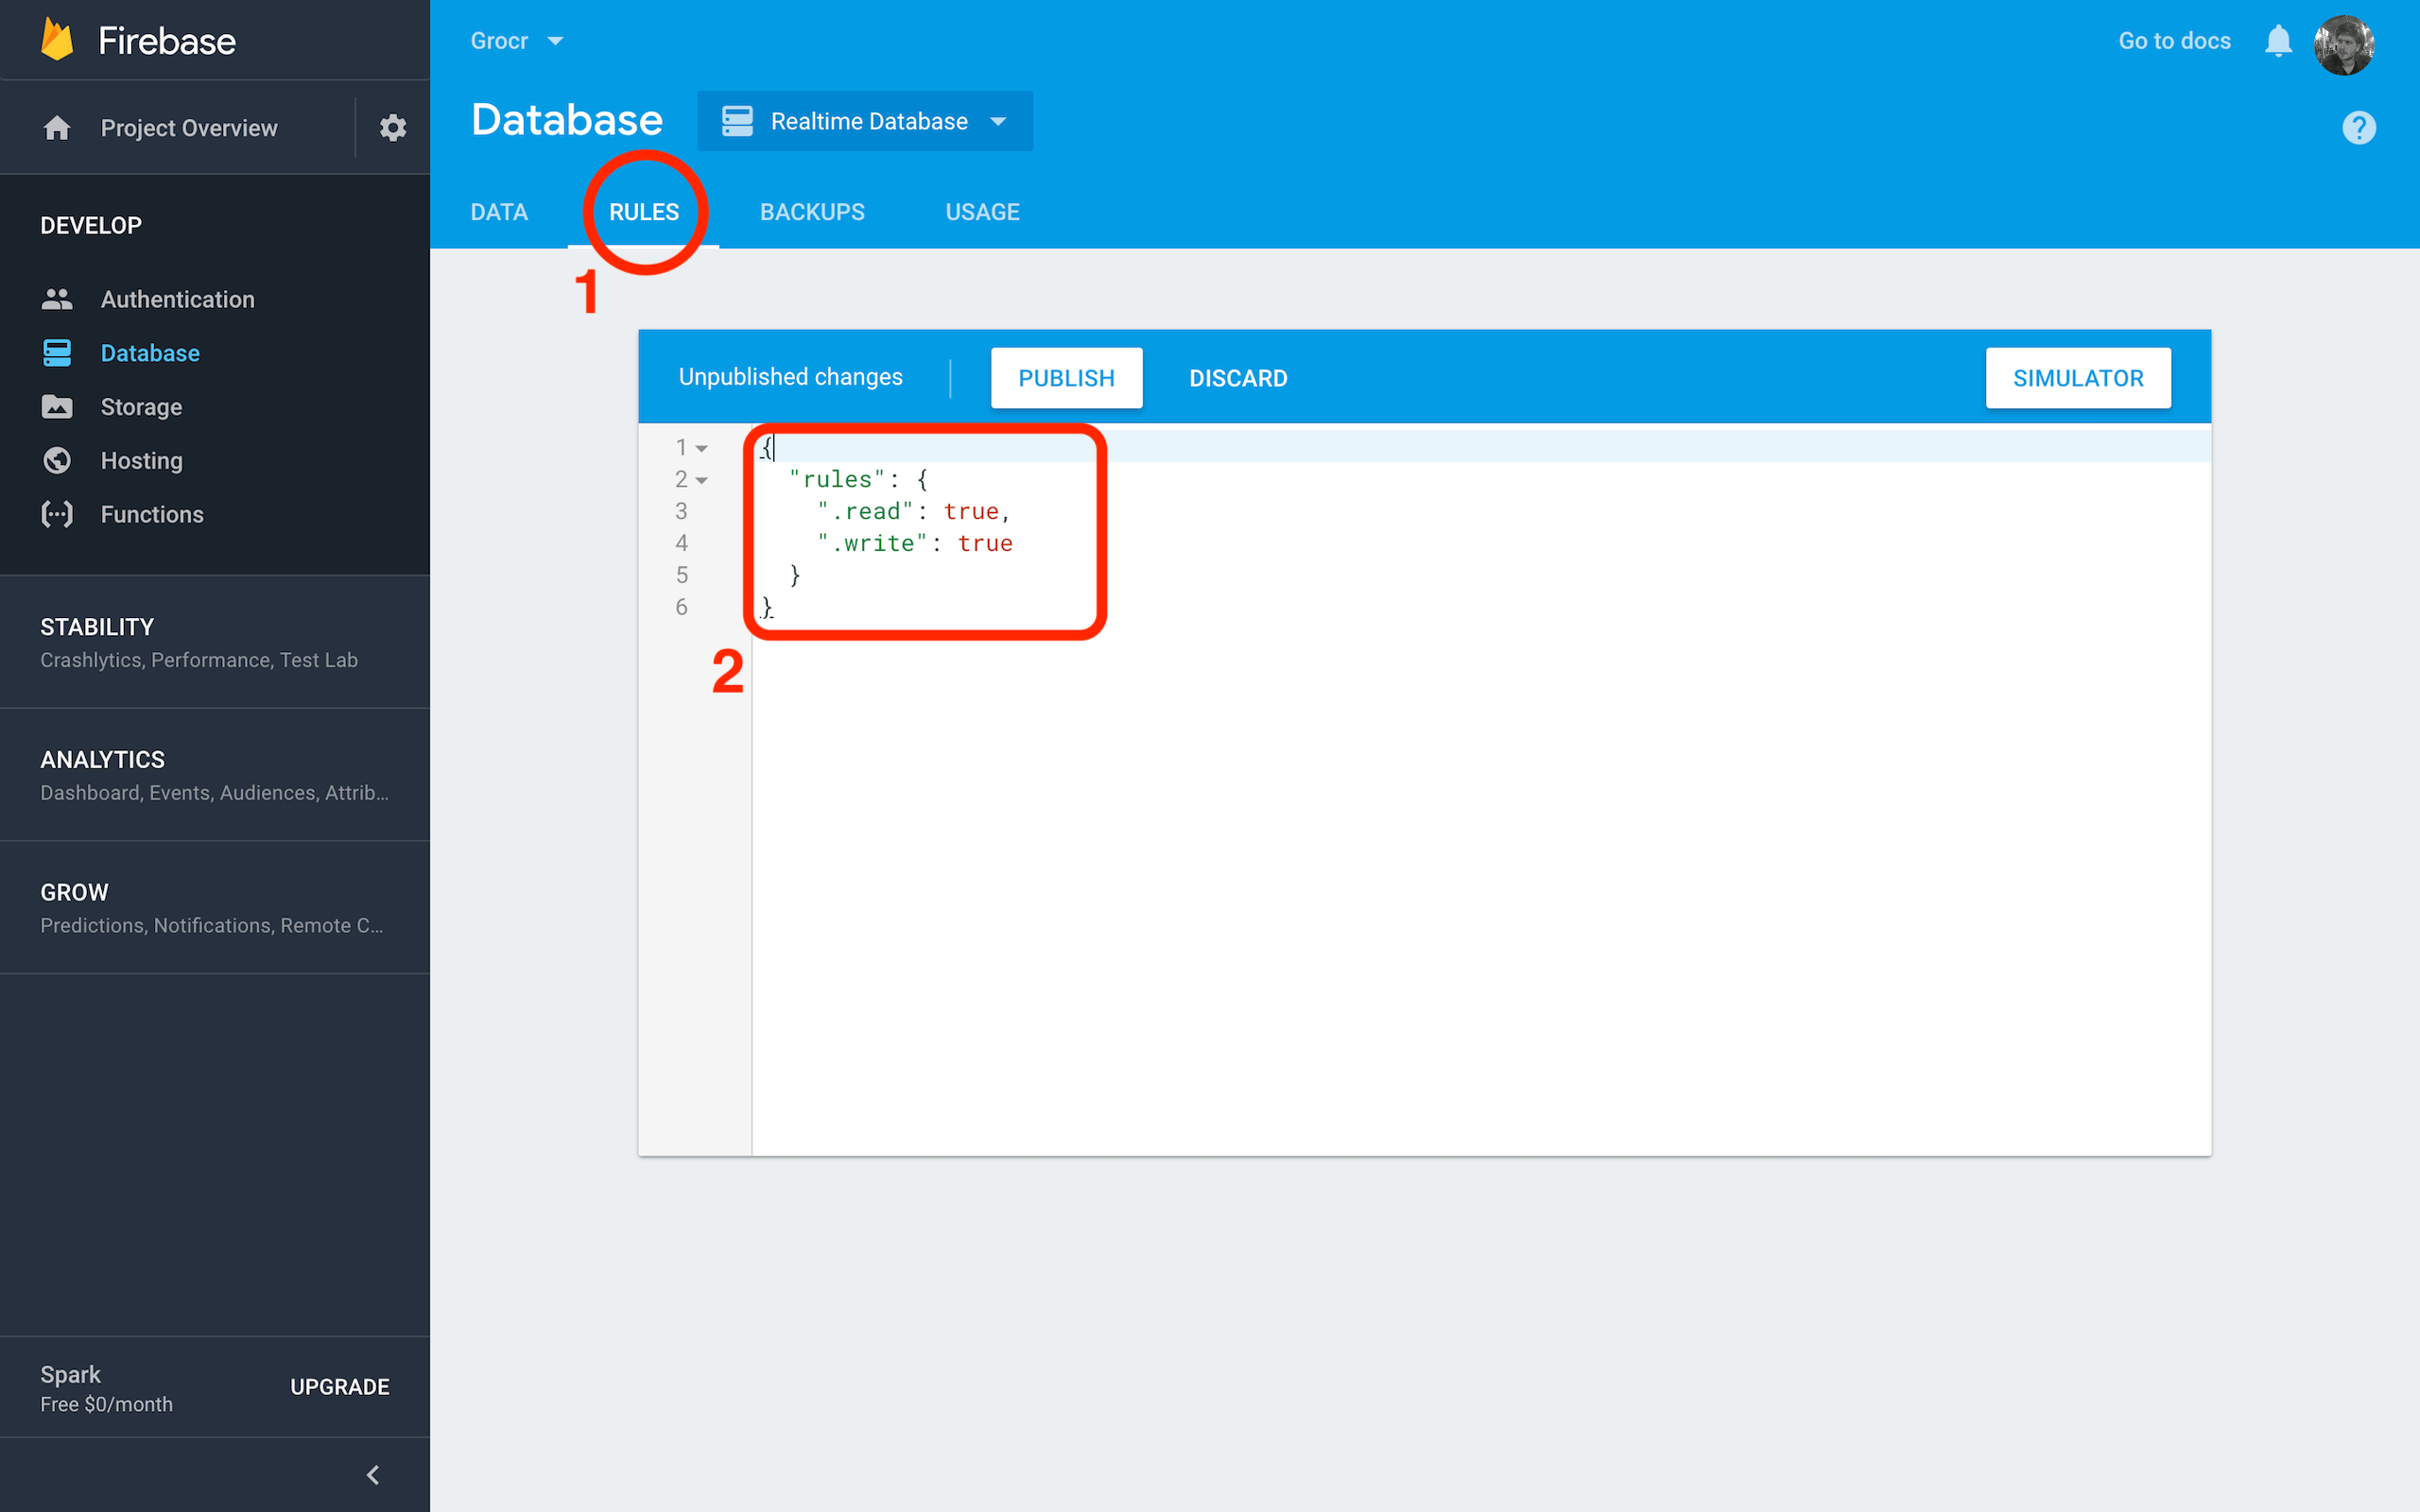
If they don’t match, replace them, then select the PUBLISH button to save your changes.
Build and run. In the Firebase dashboard, select the DATA tab and position the browser window next to the simulator. When you add an item in the simulator, you’ll see it appear in the dashboard:

Now you have a grocery list app that adds data to Firebase in realtime! So this key feature is working correctly, but none of the items are added to the table view.
So, how about you get that data synchronizing from the database to the table view?
Retrieving Data
You retrieve data in Firebase by attaching an asynchronous listener to a reference using
observe(_:with:).
Add the following to the end of
viewDidLoad() in GroceryListTableViewController.swift:ref.observe(.value, with: { snapshot in
print(snapshot.value as Any)
})
This method takes two parameters: an instance of
DataEventType and a closure.
The event type specifies what event you want to listen for. The code listens for a
.value event type, which in turn listens for all types of changes to the data in your Firebase database—add, removed, and changed.
When the change occurs, the database updates the app with the most recent data.
The app is notified of the change via the closure, which is passed an instance of
DataSnapshot. The snapshot, as its name suggests, represents the data at that specific moment in time. To access the data in the snapshot, you use the value property.
Build and run and you’ll see list items logged to the console as they’re added:
Optional({
    pizza =     {
        addedByUser = "hungry@person.food";
        completed = 0;
        name = Pizza;
    };
})
Synchronizing Data to the Table View
Now it’s time to actually display the grocery list in your table view.
In GroceryListTableViewController.swift, replace the previous snippet with the following:
// 1
ref.observe(.value, with: { snapshot in
  // 2
  var newItems: [GroceryItem] = []

  // 3
  for child in snapshot.children {
    // 4
    if let snapshot = child as? DataSnapshot,
       let groceryItem = GroceryItem(snapshot: snapshot) {
      newItems.append(groceryItem)
    }
  }

  // 5
  self.items = newItems
  self.tableView.reloadData()
})
Here’s what happening:
- Attach a listener to receive updates whenever the
grocery-itemsendpoint is modified. - Store the latest version of the data in a local variable inside the listener’s closure.
- The listener’s closure returns a snapshot of the latest set of data. The snapshot contains the entire list of grocery items, not just the updates. Using
children, you loop through the grocery items. - The
GroceryItemstruct has an initializer that populates its properties using aDataSnapshot. A snapshot’s value is of typeAnyObject, and can be a dictionary, array, number, or string. After creating an instance ofGroceryItem, it’s added it to the array that contains the latest version of the data. - Replace
itemswith the latest version of the data, then reload the table view so it displays the latest version.
Build and run. Add an item — how about some milk? — and it will show up in the table view.

No pull-to-refresh required to get the list to update in real time!

Removing Items From the Table View
The table view will synchronize on any kind of change to your data, but right now there’s nothing to update Firebase when the user decides not to get that pizza.
To notify the database of a deletion, you need to set a Firebase reference to delete an item when the user swipes it away.
Locate
tableView(_:commit:forRowAt:). Right now, this method removes a grocery item from the local array using the index path’s row. It works, but there’s a better way. Replace the existing implementation with the following:if editingStyle == .delete {
let groceryItem = items[indexPath.row]
groceryItem.ref?.removeValue()
}
Firebase follows a unidirectional data flow model, so the listener in
viewDidLoad() notifies the app of the latest value of the grocery list. A removal of an item triggers a value change.
The index path’s row is used to retrieve the corresponding grocery item. Each
GroceryItem has a Firebase reference property named ref, and calling removeValue() on that reference causes the listener you defined in viewDidLoad() to fire. The listener has a closure attached that reloads the table view using the latest data.
Build and run. Swipe an item, tap delete and watch it vanish from both your app and in Firebase.
Nice work! Your items now delete in realtime.
Checking Off Items
Now you know how to add, remove, and sync items, and that’s all pretty cool. But what about when you’re actually shopping? Should you just delete stuff that you’ve got, or would it be better to mark things off as you add them to your basket?
Back in the analog days of pens and paper, people used to cross stuff off the grocery list, so you’ll mimic that familiar behavior in this app, but with a modern twist!
When tapped, items should turn gray and show a checkmark to give the user some visual feedback that the item is no longer needed.

Open GroceryListTableViewController.swift and find
toggleCellCheckbox(_:isCompleted:). This method toggles the necessary view properties for UITableViewCell, depending on whether its associated item is complete.
It’s called from
tableView(_:cellForRowAtIndexPath:) when the table view is first loaded, and from tableView(_:didSelectRowAt:) when the user taps on a row.
Replace the current implementation of
tableView(_:didSelectRowAt:) with the following:// 1
guard let cell = tableView.cellForRow(at: indexPath) else { return }
// 2
let groceryItem = items[indexPath.row]
// 3
let toggledCompletion = !groceryItem.completed
// 4
toggleCellCheckbox(cell, isCompleted: toggledCompletion)
// 5
groceryItem.ref?.updateChildValues([
"completed": toggledCompletion
])
Here’s the play-by-play of what’s happening:
- Find the cell the user tapped using
cellForRow(at:). - Get the corresponding
GroceryItemby using the index path’s row. - Negate
completedon the grocery item to toggle the status. - Call
toggleCellCheckbox(_:isCompleted:)to update the visual properties of the cell. - Use
updateChildValues(_:), passing a dictionary, to update Firebase. This method is different thansetValue(_:)because it only applies updates, whereassetValue(_:)is destructive and replaces the entire value at that reference.
Build and run. Tap on an item and see that it toggles back and forth between the complete and incomplete statuses.

Congratulations, you’ve got yourself a pretty sweet grocery list app now!
Sorting the Grocery List
You know how sometimes you forget to pick up that ice cream because it’s nestled between a couple of things you’ve already marked off and your eyes played tricks on you? Well you, dear reader, can fix that.
The app would be 10x more awesome if checked items moved themselves to the bottom of the list automatically. Then the remaining items would be clear and easy for your eyes to see.
Using Firebase queries, you can sort the list by arbitrary properties. Still working in GroceryListTableViewController.swift, update the observer in
viewDidLoad() as follows:ref.queryOrdered(byChild: "completed").observe(.value, with: { snapshot in
var newItems: [GroceryItem] = []
for child in snapshot.children {
if let snapshot = child as? DataSnapshot,
let groceryItem = GroceryItem(snapshot: snapshot) {
newItems.append(groceryItem)
}
}
self.items = newItems
self.tableView.reloadData()
})
To order the data by the
completed value you call queryOrdered(byChild:) on the Firebase reference, which takes a key to order by.
Since the list needs to order by completed, the key
completed is passed to the query. Then, queryOrdered(byChild:) returns a reference that informs the server to return data in an ordered fashion.
Build and run. Tap on a row to toggle its completion status. The completed items magically move to the bottom of the list.

Wow! You’re really making grocery shopping easier here. Seems like it should be simple enough to sync the data across multiple users, for instance, with a significant other or housemate. This sounds like a job for…authentication!
Authenticating Users
Firebase has an authentication service that allows apps to authenticate through several providers. You can authenticate users with Google, Twitter, Facebook, Github, email & password, anonymous, and even custom backends. Here you’ll use email and password because it’s the easiest to set up.
To enable email and password authentication go to the Firebase dashboard and click on Authentication.
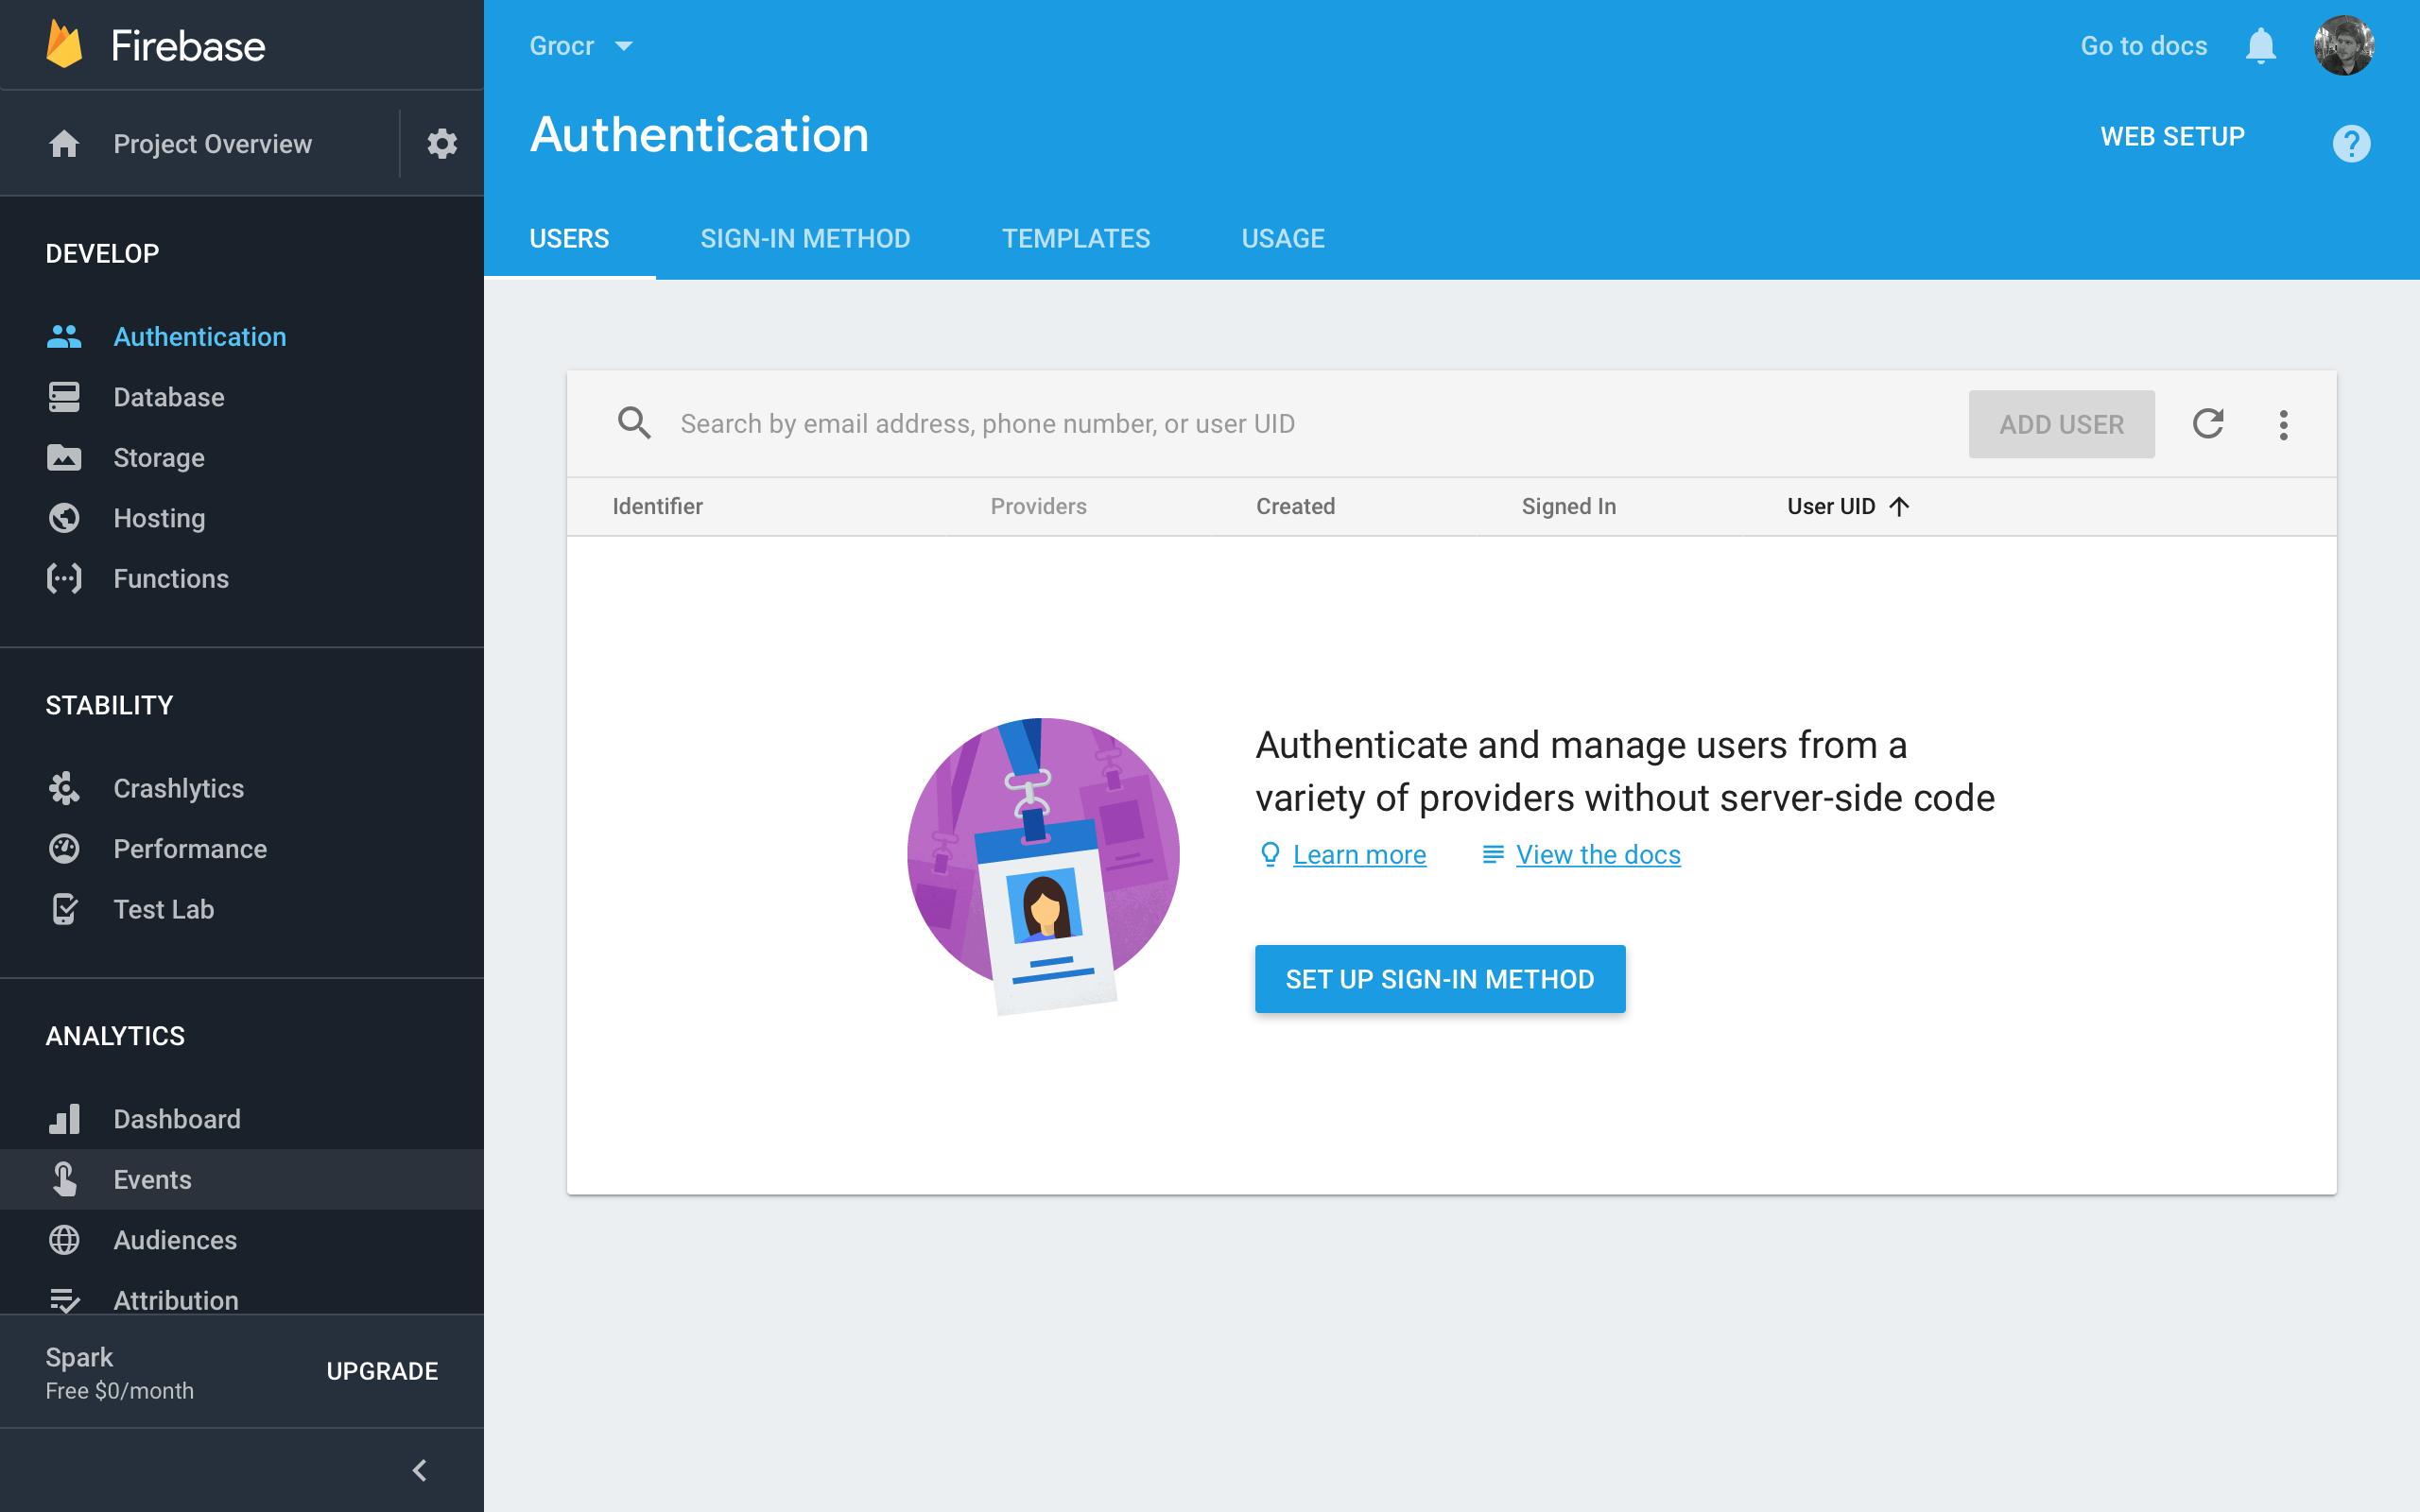
Select the SIGN-IN METHOD tab and then, in the Sign-in providers section, select the Email/Password row. Click the Enable switch and click SAVE:

Firebase stores credentials in the keychain, so as the last step enable Keychain Sharing in Xcode by navigating to your target’s Capabilities and toggling Keychain Sharing.

When prompted by Xcode, select your development team. This is required so Xcode can manage signing for you and enable the capability for the App ID automatically.
Now you’re ready to authenticate users using their email and password!
Registering Users
In LoginViewController.swift, find
signUpDidTouch(_:). This presents a UIAlertController that allows the user to register for an account. Locate saveAction and add the following to its closure:// 1
let emailField = alert.textFields![0]
let passwordField = alert.textFields![1]
// 2
Auth.auth().createUser(withEmail: emailField.text!, password: passwordField.text!) { user, error in
if error == nil {
// 3
Auth.auth().signIn(withEmail: self.textFieldLoginEmail.text!,
password: self.textFieldLoginPassword.text!)
}
}
Here’s what’s going on in the above code:
- Get the email and password as supplied by the user from the alert controller.
- Call
createUser(withEmail:password:)on the default Firebase auth object passing the email and password. - If there are no errors, the user account has been created. However, you still need to authenticate this new user, so call
signIn(withEmail:password:), again passing in the supplied email and password.
Build and run. Tap the Sign up button and enter an email and a password, then tap save. The view controller won’t navigate to anything on successful login just yet. If you refresh the Firebase Login & Auth tab you’ll see the newly created user.

W00T! The app now registers users and then lets them log in. Don’t celebrate yet though, you need to finish the process so people can actually use the app as intended.
Logging Users In
The Sign up button can register and log in users. However, the Login button effectively does nothing because no authentication is performed.
Still working in LoginViewController.swift, find
loginDidTouch(_:) and replace its implementation with the following:guard
let email = textFieldLoginEmail.text,
let password = textFieldLoginPassword.text,
email.count > 0,
password.count > 0
else {
return
}
Auth.auth().signIn(withEmail: email, password: password) { user, error in
if let error = error, user == nil {
let alert = UIAlertController(title: "Sign In Failed",
message: error.localizedDescription,
preferredStyle: .alert)
alert.addAction(UIAlertAction(title: "OK", style: .default))
self.present(alert, animated: true, completion: nil)
}
}
This code will authenticate the user when they attempt to log in by tapping the Login button.
You now need to perform the segue to the next controller only when the user has logged in.
Observing Authentication State
Firebase has observers that allow you to monitor a user’s authentication state. This is a great place to perform a segue.
Add the following to LoginViewController:
override func viewDidLoad() {
  super.viewDidLoad()

  // 1
  Auth.auth().addStateDidChangeListener() { auth, user in
    // 2
    if user != nil {
      // 3
      self.performSegue(withIdentifier: self.loginToList, sender: nil)
      self.textFieldLoginEmail.text = nil
      self.textFieldLoginPassword.text = nil
    }
  }
}
Here’s a run-down of what’s happening:
- Create an authentication observer using
addStateDidChangeListener(_:). The block is passed two parameters:authanduser. - Test the value of
user. Upon successful user authentication,useris populated with the user’s information. If authentication fails, the variable isnil. - On successful authentication, perform the segue and clear the text fields’ text. It may seem strange that you don’t pass the user to the next controller, but you’ll see how to get this within GroceryListTableViewController.swift.
Setting the User in the Grocery List
Go to GroceryListTableViewController.swift, and add the following to the bottom of
viewDidLoad():Auth.auth().addStateDidChangeListener { auth, user in
guard let user = user else { return }
self.user = User(authData: user)
}
Here you attach an authentication observer to the Firebase auth object, which in turn assigns the
user property when a user successfully signs in.
Build and run. If a user is logged in, they bypass
LoginViewController and segue to the GroceryListTableViewController. When users add items, their email will show in the detail of the cell.
Logging Users Out
Since users can login in, it makes sense they should be able to log out too. Open OnlineUsersTableViewController.swift and replace the code inside
signoutButtonPressed(_:) with this:// 1
let user = Auth.auth().currentUser!
let onlineRef = Database.database().reference(withPath: "online/\(user.uid)")
// 2
onlineRef.removeValue { (error, _) in
// 3
if let error = error {
print("Removing online failed: \(error)")
return
}
// 4
do {
try Auth.auth().signOut()
self.dismiss(animated: true, completion: nil)
} catch (let error) {
print("Auth sign out failed: \(error)")
}
}
Here’s what this does:
- You first get the
currentUserand createonlineRefusing itsuid, which is a unique identifier representing the user. - You call
removeValueto delete the value foronlineRef. While Firebase automatically adds the user toonlineupon sign in, it does not remove the user on sign out. Instead, it only removes users when they become disconnected. For this application, it doesn’t make sense to show users as “online” after they log out, so you manually remove them here. - Within the completion closure, you first check if there’s an error and simply print it if so.
- You here call
Auth.auth().signOut()to remove the user’s credentials from the keychain. If there isn’t an error, you dismiss the view controller. Otherwise, you print out the error.
Build and run, tap the left navigation item, press Sign Out, and you’ll be returned to the login page.

Success! The app now has basic user authentication.
Monitoring Users’ Online Status
Now that the app has user authentication, its time to detect which users are online. Open GroceryListTableViewController.swift and add the following property:
let usersRef = Database.database().reference(withPath: "online")
This is a Firebase reference that points to an online location that stores a list of online users.
Next, add the following to the bottom of the
addStateDidChangeListener(_:) closure inside viewDidLoad():// 1
let currentUserRef = self.usersRef.child(self.user.uid)
// 2
currentUserRef.setValue(self.user.email)
// 3
currentUserRef.onDisconnectRemoveValue()
The code above follows these steps:
- Create a child reference using a user’s
uid, which is generated when Firebase creates an account. - Use this reference to save the current user’s email.
- Call
onDisconnectRemoveValue()oncurrentUserRef. This removes the value at the reference’s location after the connection to Firebase closes, for instance when a user quits your app. This is perfect for monitoring users who have gone offline.
Build and run. When the view loads, the current user’s email is added as a child in the online location.

Great! Now it’s time to change the number of the bar button item as the user count grows.
Updating the Online User Count
Still working in GroceryListTableViewController.swift, add the following code to
viewDidLoad():usersRef.observe(.value, with: { snapshot in
if snapshot.exists() {
self.userCountBarButtonItem?.title = snapshot.childrenCount.description
} else {
self.userCountBarButtonItem?.title = "0"
}
})
This creates an observer that is used to monitor online users. When users go online and offline, the
title of userCountBarButtonItem updates with the current user count.Displaying a List of Online Users
Open OnlineUsersTableViewController.swift and, just as you did before, add a local reference to Firebase’s online users record in the class’s property section:
let usersRef = Database.database().reference(withPath: "online")
Then, in
viewDidLoad(), replace:currentUsers.append("hungry@person.food")
with the following:
// 1
usersRef.observe(.childAdded, with: { snap in
  // 2
  guard let email = snap.value as? String else { return }
  self.currentUsers.append(email)
  // 3
  let row = self.currentUsers.count - 1
  // 4
  let indexPath = IndexPath(row: row, section: 0)
  // 5
  self.tableView.insertRows(at: [indexPath], with: .top)
})
Here’s what’s happening in the code:
- Create an observer that listens for children added to the location managed by
usersRef. This is different than a value listener because only the added child is passed to the closure. - Take the value from the snapshot, and then append it to the local array.
- The current row is always the count of the local array minus one because the indexes managed by the table view are zero-based.
- Create an instance
NSIndexPathusing the calculated row index. - Insert the row using an animation that causes the cell to be inserted from the top.
This will only render items as they are added rather than reloading the entire list, and it also gives you the ability to specify a nice animation. :]
Since users can go offline, the table needs to react to users being removed as well. Add the following below the code you just added:
usersRef.observe(.childRemoved, with: { snap in
  guard let emailToFind = snap.value as? String else { return }
  for (index, email) in self.currentUsers.enumerated() {
    if email == emailToFind {
      let indexPath = IndexPath(row: index, section: 0)
      self.currentUsers.remove(at: index)
      self.tableView.deleteRows(at: [indexPath], with: .fade)
    }
  }
})
This simply adds an observer that listens for children of the
usersRef reference being removed. It searches the local array for the email value to find the corresponding child item, and once located, it deletes the associated row from the table.
Build and run.
Tap Online in the Firebase users dashboard, and the current user’s email will appear in the table. Using a bit of trickery, it’s possible to add a user to Online, and once you do, it shows in the list. Click the Remove button in the Dashboard and the user fades from existence.
Booyah! The table updates when users are added and removed.
Enabling Offline
Grocery stores are notorious for spotty data connections. You’d think they’d all have Wi-Fi now, but no!
No problem, you’ll just set up your database to work offline. Open AppDelegate.swift and add the following to the end of
application(_:didFinishLaunchingWithOptions:), before return true:Database.database().isPersistenceEnabled = true
Yup, that’s it! Just like that your app works offline. Even offline updates that occur across app restarts will apply to your Firebase database once a connection is made. Oooh-ahhhh!


0 Comments